The Samba Server
Samba is a full-featured implementation of a Server Message Block (SMB) server, which can offer transparent file services to Windows (95, 98, NT, 2000) clients, as well as to OS/2 clients. The brain child of LinuxCare's Andrew Tridgell back in 1992, Samba is now widely used and updated with help from programmers from all over the world.
Samba allows network administrators to use a Linux server's ability to store and manage a large number of files, while still preserving the use of Windows-based desktop clients. In addition to file services, Samba offers the following features:
■ Print services, by making a Linux-controlled printer available from Windows desktops as a standard network printer
■ Authentication and authorization services, where access to network shares is granted only after the appropriate username and password is provided
■ Name resolution, by mapping network share (NetBIOS) names into standard IP addresses
■ The ability to announce its existence in a "browse" list
Samba's popularity stems from the fact that Linux shares are viewed on a Windows client exactly as other Windows-based drives and printers are viewed, which makes the fact that Linux is being used totally transparent to the end user.
Another selling feature of Samba is its performance. Independent tests have shown that as of version 2, the Samba server is nearly twice as fast as an equivalent Windows NT 4.0 server using the same hardware.
Samba is an implementation of IBM's Network Basic Input Output System (NetBIOS) protocol, which runs over TCP in order to traverse IP routers and to extend the reach of NetBIOS beyond the LAN environment for which it was originally designed. The SMB blocks are transported inside NetBIOS data units, which make up the payload of the TCP packet Figure 8.1 illustrates the composition of a typical SMB packet, starting with the data link layer at the bottom (Ethernet), and going up the stack with the IP, TCP, and NetBIOS layers.
Figure 8.1 Samba's SMB transport over NetBIOS
|
Application | ||
|
Presentation |
SMB | |
|
Session |
NetBIOS | |
|
Transport |
TCP |
UDP |
|
Network |
IP | |
|
Data Link |
Ethernet | |
The original Microsoft LAN Manager implementation of file and printer sharing over a local area network did not use NetBIOS or TCP/IP as the underlying protocol. Instead, it used the special-purpose NetBEUI (NetBIOS Extended User Interface) protocol for this purpose (see Figure 8.2). The NetBEUI protocol makes up the network, transport, and session OSI layers. Due to NetBEUI's lack of WAN-routing abilities, the original LAN Manager implementation was not able to share files and printers over the Internet, just over the local network. This essentially eliminated security as a concern, but reduced its usefulness, since you couldn't share resources with remote offices connected via routed IP networks.
Figure 8.2 LAN Manager's SMB transport over NetBEUI
PART 3
|
Application | |
|
Presentation |
SMB |
|
Session | |
|
Transport |
NetBEUI |
|
Network | |
|
Data Link |
Ethernet |
Samba is offered under Gnu's General Public License (GPL), which allows for the free use and distribution of the package, as long as the full source code is also made available.
This section of the book shows you how to install and configure the Samba server with security in mind. For a complete reference on the installation, configuration, and administration of the Samba server on a Linux server, please refer to Linux Samba Server Administration, by Roderick Smith (Sybex, 2000), part of the Craig Hunt Linux Library series.
The Samba home page (Figure 8.3) contains valuable information about the ongoing development of Samba. It includes the following information:
■ News about the latest Samba release
■ Resources for Samba developers
■ Documentation, including the latest books on Samba
■ Downloads of Samba source code for various operating system platforms
■ Downloads of plug-ins for your Samba server
■ Downloads and information about several graphical user interfaces (GUIs) that can simplify the configuration and management of your Samba server
■ Information about Samba-related mailing lists
To get to the Samba home page, go to www.samba.org and choose the Web mirror site closest to your geographic location.
Figure 8.3 The Samba Project home page
|
[<tr SAMBA - ulftniiriu mmJuwx to a |
rrtiídi wwW - Mul&cd|)e | |||
|
;Jl YiW« fid ÜW IMJAcdd |
Hab | |||
|
•i¡ ¿ F-wkrftVií .y Lûftiiûw[^ |
fp7Ais1 inrrerg/jamhuís¿rita hlmí |
(far v<toalü¡ Relatan S | ||
|
• ¿íVíLopitirCJl |
safnAa |
■ thmks | ||
|
• dmvtduaii |
• LïtTOï.&Ç- | |||
|
Welcome to Ihc Samba web pages | ||||
|
Samba is an >pen source software suite Tfaat cfovuks seamless fils ar.d print seraccs to SMB/C2FS dieras, Samba is freely available under the GNU Genera] Public L.:cnse | ||||
|
Samba News | ||||
|
ní —-i-- iRnïiîTtti |
■ (22eid Wiweinbar 200DJ Sa.ty.eia 2.2.0afyka! stsapsSici released A nsw alpha TCfsioti of what will bsdoiiae Samba 2.2.0 has be«i released. This is bemg tr.adc available m source coiSo form only. You can <kiwaii»ad a aliened versioahere (---5 2Mb) or a buDtJversion here 3Mb). l-Dflffl |
J, fik M ES -i | ||
Installing Samba
Most recent Linux distributions include the Samba server right out of the box. Here's how you can make sure Samba is installed on Red Hat 7.0:
[ramonjî rpm -q samba samba-common samba-2.0.7-21ss1 samba-common-2.0.7-21ss1
Two packages make up a complete Samba installation:
samba-2.0.7-21ss1 This is the base Samba server package and it includes the following files:
■ Server executable
■ Startup scripts
■ Manual pages
■ Text and HTML documentation
■ Samba Web Administration Tool (SWAT) samba-common-2.0.7-21ss1 This is the set of utilities and configuration files that are common to both the server and the client and that need to be installed to provide the service. This package includes the Samba codepages, the smb.conf configuration file, and several utilities to test the configuration before the server goes in production.
NOTE A Samba codepage definition file is a description that tells Samba how to map from uppercase to lowercase for characters greater than ASCII 127 in the specified DOS codepage.
If you are not running the latest version of these two packages, you can download them from your favorite repository. I recommend that you use a reputable, well-known archive such as www.rpmfind.net to minimize the risk that legitimate packages are replaced by Trojan horses.
Once you have obtained the RPM packages, install them using the following commands: [ramonjî sudo rpm -U samba-2.0.7-21ssl-i386.rpm [ramonjî sudo rpm -U samba-common-2.0.7-21ssl-i386.rpm
PART 3
Samba Administration with SWAT
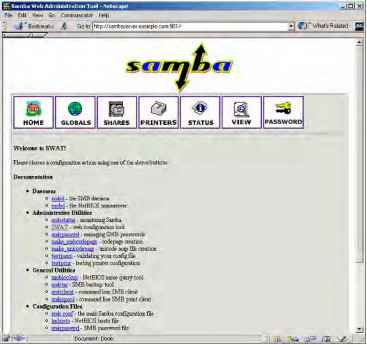
The Samba Web Administration Tool (SWAT) was included in the standard Samba server distribution starting with version 2.0. SWAT is a useful utility for managing the smbd and nmbd servers, as well as for managing the /etc/samba/smb.conf configuration file. As with other tools of this kind, SWAT is an HTTP server that listens on a special port (TCP 901, in this case) and can be used with any Web browser by just pointing to the URL http://my.samba.host:901 (see Figure 8.4), where my.samba.host is the name of your Linux server running Samba.
Figure 8.4 The Samba Web Administration Tool
Figure 8.4 The Samba Web Administration Tool
In order to start using SWAT, first make sure there is an entry in the /etc/services file for port TCP 901. You can do this with the following command:
[ramon]$ grep swat /etc/services swat 901/tcp
Then simply modify inetd or xinetd so that it starts the listener daemon. If you're running inetd, add the following line to the /etc/inetd.conf file:
swat stream tcp nowait root /usr/sbin/tcpd /usr/sbin/swat
If you're running xinetd, edit the existing /etc/xinetd.d/swat file to enable the entry. Listing 8.1 shows a sample /etc/xinetd.d/swat file.
Listing 8.1 Sample /etc/xinetd.d/swatfile
# default: off
# description: SWAT is the Samba Web Admin Tool. Use swat \
# to configure your Samba server. To use SWAT, \
# connect to port 901 with your favorite web browser.
service swat {
port = 901 socket_type = stream wait = no only_from = 10.0.0.100 user = root server = /usr/sbin/swat log_on_failure += USERID
Note in Listing 8.1 that I have included the directive only_from to restrict connections to £ S SWAT to my workstation (10.0.0.100). This is a very important security feature because you typically don't want people connecting to SWAT from just any host on your network, or on the Internet! If you're using inetd, make sure that only host 10.0.0.100 is able to connect to port 901 by adding the following line to /etc/hosts.allow:
In addition, add the following line to /etc/hosts.deny:
swat: ALL
WARNING In order to avoid exposure of the root password, restrict access to the SWAT server to the Linux server itself (ideally), or at least to hosts that are on a protected segment that includes the server. If you must access the SWAT service remotely, follow the SSL instructions described in the following section.
SWAT-SSL
Chapter 7, "HTTP Services," described the use of the Secure Sockets Layer implementation for Linux (OpenSSL) and its ability to protect the communication between Web clients and Apache HTTP servers. Like Apache, SWAT is an HTTP server, and as such, it can be integrated with OpenSSL to ensure the privacy of your Samba administration commands.
First, make sure that OpenSSL is installed on your system: [ramon]$ rpm -q openssl openssl-0.9.5a-14
Next, download and install the stunnel package. The stunnel utility is a wrapper used to add SSL encryption to arbitrary network applications. The following command installs the /usr/sbin/stunnel daemon application:
In order to successfully SSL-wrap SWAT, you need to create a server certificate as follows:
[ramon]$ cd /usr/share/ssl/certs
[ramon]$ sudo make stunnel.pem
The result is the creation of the necessary certificate in the file /usr/share/ssl/certs/ stunnel.pem. You are now ready to invoke the stunnel wrapper using this command:
[ramon]$ sudo stunnel -p /usr/share/ssl/certs/stunnel.pem -l /usr/ sbin/swat swat -d 901
Include this command as a startup file in the /etc/rc.d/init.d directory.
In addition, don't forget to disable the xinetd entry for SWAT (simply set disable = yes in /etc/xinetd.d/swat) and restart xinetd in order for the changes to take effect.
You can also start stunnel/SWAT from inetd by adding the following line to /etc/ inetd.conf:
swat stream tcp nowait root /usr/sbin/tcpd /usr/sbin/stunnel stunnel^ -p /usr/share/ssl/certs/stunnel.pem -l /usr/sbin/swat
Or from xinetd, add the following commands to /etc/xinetd.d/swat:
# default: off
# description: SWAT is the Samba Web Admin Tool. Use swat \
# to configure your Samba server. To use SWAT, \
# connect to port 901 with your favorite web browser.
service swat {
port = 901 socket_type = stream wait = no only_from = 10.0.0.100 user = root server = /usr/sbin/stunnel server_args = -p /usr/share/ssl/certs/stunnel.pem -l /usr/sbin/
swat log_on_failure += USERID disable = no
You can now access the SWAT application via SSL using the URL https:// my.samba.host :901 from your favorite Web browser.
Note that you are prompted to accept the certificate since it is self-signed, and its trust cannot be verified with any of the root certificates installed in your browser.
Securing Samba
This section discusses the security issues associated with running a production Samba server, including user authentication, access control, and data privacy. Let's start by looking at Samba's options for user authentication using usernames and passwords.
User Authentication
Most remote SMB requests include some level of authentication credentials, including a username and, optionally, a password. By default, Samba uses the existing Linux /etc/ passwd file to look up the username furnished with SMB requests. The client sends the cleartext password, and Samba compares it to the hashed password found in /etc/ passwd. This procedure used to work just fine for older versions of Windows, but starting with Windows 95 OSR2 (and including Windows 98, NT 4.0-SP3+, and 2000), Microsoft clients only supply an encrypted password when authenticating to a remote SMB server. Windows 9x uses an older style of encryption of LAN Manager legacy, while Windows NT 4.0 and Windows 2000 use a newer, more robust encryption algorithm.
The framework for SMB password encryption is quite robust. Neither the client nor the server keeps the passwords in the clear, and the client doesn't even send the encrypted password when authenticating to the server. Instead, the server issues a challenge to the client, which the client uses to hash the encrypted password. This hash is sent to the server, which performs the same operation and compares the results.
Forcing the client to supply encrypted passwords is a very good idea, although it requires a bit of work on the Samba server side. First, you must instruct Samba to accept encrypted passwords by including the following directive in the smb.conf file:
[global]
encrypt passwords = yes
PART 3
NOTE The smb.conf file is where Samba stores all its runtime configuration information. This file is divided into sections (also called stanzas) that are delimited by a word inside square brackets (e.g., [header]). While most of these stanzas refer to a specific resource to be shared such as directories, files, and printers, the [global] header starts the stanza where you can place parameters that will be applied to all shares. Most security parameters will be placed in this stanza unless you need to define exceptions for a particular share.
Next, since Samba cannot verify an encrypted client password against the regular Linux /etc/passwd file, you need to create a parallel but separate Samba password file, which can be maintained using the Samba-supplied smbpasswd utility. By default, the Samba passwords are kept in the /etc/samba/smbpasswd file.
TIP Even though the passwords in smbpasswd are encrypted, make sure that file is not accessible (for either read or write) by anybody other than the root user.
To add a new user to the file, issue the following command: [ramon]$ sudo smbpasswd -a stacia New SMB password: Retype new SMB password: Added user stacia. Or you can change your own password using the following command: [ramon]$ smbpasswd Old SMB password: New SMB password: Retype new SMB password: Password changed for user ramon.
Note that both username stacia and ramon must already be present in the standard Linux /etc/passwd file. However, the password supplied to smbpasswd does not have to be the same one already present in /etc/passwd.
TIP Although there is a well-known procedure to force newer Windows clients to send cleartext passwords (by modifying the registry), I strongly discourage this. Passwords should always be encrypted to avoid trivial eavesdropping attacks over public networks.
Entries in the smbpasswd file follow this general format:
User:UID:LAN-Manager-password:NT-password:account-flags:update-time
Each of these fields has the following meaning:
User User is the textual username supplied by the client. This field must match a username in the local /etc/passwd file.
UID UID is the numeric user ID. This field must also match an /etc/passwd entry.
LAN-Manager-password LAN-Manager-password is the encrypted representation of the old-style (Windows 9x) password. The actual entry is computed by DES-encrypting a well-known character sequence using the repeated password (in all capitals) as the key.
NT-password NT-password is the encrypted representation of the new-style (Windows NT and 2000) password. This field results from the MD4 hashing of the password in Unicode format.
account-flags The account-flags field is a combination of the following four types of flags:
■ U: This flag indicates a standard user account.
■ D: This flag indicates a disabled account (no logins allowed).
■ N: This flag indicates an account with no password.
■ W: This flag indicates a workstation account, which is used to configure Samba as an NT PDC.
update-time The update-time field is the seconds since the epoch (1 January 1970) when the entry was last updated.
Access Control
Whenever the Samba server receives an SMB request from a client, the server tells the client which authentication setting it should conform to. Samba supports four fundamental modes of authentication, reflected as the four options to the following smb.conf directive:
security = [share|user|server|domain]
Let's take a closer look at each of these four access-control choices.
share mode By setting up one or more passwords for general access to a file, directory, or printer, you can allow all your users access by providing the same password(s). This is generally not recommended, except for allowing access to guest shares, as well as giving general access to print servers.
Even though SMB clients are not required to provide a username for share mode resources, Samba still needs to operate within the Linux paradigm, which requires user
PART 3
ownership for all its resources. So Samba tries to come up with a good default username to use on the client's behalf. Here are the options that Samba uses as username defaults (in decreasing order of precedence):
■ If smb.conf includes the configuration lines guest only = yes and guest account = guest, then the username guest is always chosen.
■ If the client includes a user with the request anyway, the username supplied is chosen.
■ If the client has previously connected to the Samba server, the username that was supplied at that time is chosen.
■ If none of the above, then the name of the requested service is chosen.
■ If the name of the requested service is not available, the NetBIOS name of the requesting client is chosen.
■ As a last resort, the user descriptions present in the smb.conf file under the username= userl, user2,.. directive are chosen.
It's important to note that if smb.conf includes the configuration lines guest only = yes and guest account = guest, then the username guest is always chosen. However, if guest only = no, and the password supplied by the client does not match one of the users included in the username= directive, access to the share is denied.
While all this seems overly elaborate, the point is simple: Samba must find a Linux username that can be authenticated with the password supplied by the requesting client. The easiest way to ensure this is to assign the same usernames for Windows clients and for interactive logins to the Linux server (/etc/passwd or /etc/shadow). This makes your users and shares easier to manage across both platforms.
For example, consider the following smb.conf configuration. The [Sales] stanza defines a resource to be shared, in this case, the /homes/marketing directory. This resource is writable and can be browsed using the standard Microsoft Network Neighborhood browsing facility. Note that the directive security = share is included in the [global] stanza, but you have qualified it with the guest only = no and username = ramon, stacia directives in the [Sales] stanza. This combination of directives allows share mode access to the Sales share, but only if the password supplied by the client matches the password for either ramon or stacia, or it matches the password for a user that has previously connected to the Samba server.
[global]
security = share [Sales]
Comment = Sales Share
Path = /homes/marketing writable = yes browseable = no guest only = no username = ramon, stacia user mode user mode goes a step beyond share mode by forcing each user to provide a unique username and password combination before granting access to a share. This is clearly recommended over share mode because it allows the administrator to grant or deny access to a share on a per-user basis, and eliminates the complex login used by share mode to assign a default user. user mode is the default authentication mode as of Samba 2.0.
NOTE If the guest only = yes directive is present in smb.conf, the Linux username will be changed to the one specified by the guest account = directive, but only after the supplied password has been verified to belong to the supplied username.
For example, consider the following smb.conf configuration. The security = user «
directive is included in the [global] stanza, but it is qualified with the valid users = ramon, stacia directive in the [Marketing] stanza (where the sharing of the /homes/ marketing directory is defined). This combination of directives allows only users ramon and stacia access to the Marketing share, only after they have supplied a valid username and password combination.
[global]
security = user [Marketing]
Comment = Marketing Share Path = /homes/marketing writable = yes browseable = no valid users = ramon, stacia server mode When the server mode type of access control is specified, the supplied username and password combination is not checked locally, but instead, is sent to a remote SMB server for verification. The remote server then returns the outcome of the authentication request to the local server. If the remote server cannot authenticate the client, then the local server reverts to user mode access control. The remote server can be a Windows NT machine or another Samba server configured to run in user mode. The name of the remote server must be specified with the password server = directive in the smb.conf file.
The server mode of authentication is useful when you're operating several Samba servers but only want to have a single authentication point for the majority of your user population. You still have to have the users present in the local /etc/passwd file, but their accounts can (and should) be disabled.
As an example, consider the following smb.conf configuration. This server consults with SMB server LINUX_SAMBA_1 for username/password authentication. If LINUX_SAMBA_1 is unavailable, it next consults with SMB server LINUX_SAMBA_2. Note however, that if LINUX_SAMBA_1 returns an authentication denial, the client is denied access before even consulting the next server on the list.
[global]
security = server password server = LINUX_SAMBA_1 LINUX_SAMBA_2
domain mode domain mode is a special case of server mode, where the remote SMB server is an NT domain controller with which the local Samba server has previously established a trust relationship using the command smbpasswd -j NT-Domain -r NT-Domain-Controller
In this command, NT-Domain is the name of the domain you wish to be part of and NT-Domain-ControHer is the NetBIOS name of the primary domain controller (PDC) for the given domain. By establishing a trust relationship between the local Samba server and the remote Windows NT domain controller, you are allowing the local Samba server to validate the username/password supplied by a requesting client by passing it to a the Windows NT domain controller. This is the same way a Windows NT server that is a member of a given domain passes user authentication requests on to a domain controller for approval. This is a useful access control option for integrating a few Samba servers into an existing NT domain network.
To use domain mode access control, simply include the appropriate directive in the smb.conf file. In the following example, the NT domain controllers ENG_SAMBA_1 and ENG_SAMBA_2 are used (in that order) to authenticate clients' requests:
[global] security = domain workgroup = ENGINEERING domain logins = yes password server = ENG_SAMBA_1 ENG_SAMBA_2
NOTE If your remote SMB server is a Windows NT server, domain mode access control is always preferable to server mode because server mode consumes a license on the Windows NT server for the duration of the client-server connection. domain mode authentication, on the other hand, releases the connection (and the Windows NT license instance) as soon as the authentication is performed. This is important because Microsoft's licensing strategy revolves around concurrent server connections.
Other Access Control Features In addition to these four access control methods, you may choose to take advantage of a trust relationship between your local NT domain and a second, trusted NT domain. As of Samba 2.0.4, the smb.conf directive allow trusted domain = yes can be used to gain authentication from an NT domain controller that, although it is not primary to your domain, is trusted by your PDC.
Another recent addition to the access control feature set of Samba is the add user script = script directive. This can be used in both user and domain access control modes to automatically add a user in the event that the user/password is authenticated by the password server but the user is not present locally. For example, you may want Samba to automatically add a user locally using the following smb.conf directive:
add user script = sudo /usr/sbin/useradd %u
Conversely, a delete user script = script directive can be specified to delete a user that exists locally but is no longer valid on the PDC. An example of this usage is as follows:
delete user script = sudo /usr/sbin/userdel %u
While adding and deleting local users in this fashion may be convenient, I urge you to implement it carefully because you are allowing the unattended creation and deletion of users in the same /etc/passwd or /etc/shadow files that you use for regular Linux server authentication.
The [homes] Directive A common approach to allowing all Linux server users access to their home directories is the special [homes] directive in the smb.conf file. Consider the following example:
[homes]
comment = Home Directories browseable = no writable = yes
This directive specifies that any user in /etc/passwd can gain access to their home directory by pointing their SMB client to \\server\username. This is not always desirable
PART 3
because this file includes system-related accounts such as root, operator, uucp, and bin. To ensure that these users are not granted access, use the invalid users = directive to exclude these usernames, as in the following example:
[global]
invalid users = root, operator, uucp, bin Privacy of Samba Communications
Samba uses the TCP/IP layer to carry NetBIOS traffic from client to server. This allows you to share drives over the Internet, a convenient but often insecure practice because the contents of your files are exposed to potential eavesdroppers. If you are going to be exchanging SMB traffic over a public (untrusted) network like the Internet, your security policy needs to include a provision to ensure the privacy and authentication of this type of traffic.
There is a way to secure the contents of the SMB traffic by using the ever-popular OpenSSL implementation you used to tunnel SWAT traffic that was described in the previous section. Since Windows SMB clients don't support SSL directly, you have to set up a proxying SSL station at the edge of your local (trusted) network, which encrypts traffic and forwards it to the destination SSL-enabled Samba server on the client's behalf. This process is illustrated in Figure 8.5.
Figure 8.5 Using SSL protection with Samba
Figure 8.5 Using SSL protection with Samba
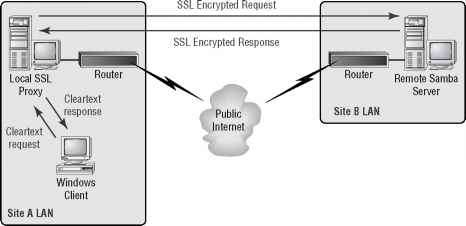
The figure shows two corporate sites (Site A and Site B) connected to the Internet by an access router. Behind Site A's access router, a Linux server has been set up as an SSL proxy. A typical Windows SMB client in Site A's LAN directs its SMB request to the local
SSL proxy, which then relays the connection to Site B's Samba server inside an OpenSSL tunnel. While Site B's server also replies with an encrypted response, Site A's SSL proxy relays it in the clear back to the Windows client. This ensures that the SMB traffic is protected, at least while traveling over the public Internet. Be aware, however, that the SMB traffic travels in the clear within Site A's local network.
Creating a Certificate Authority for Samba-SSL The first step in setting up any SSL
application is to create a certificate authority (CA) to issue the necessary digital certificates for the mutual authentication of the two endpoints. Start by making sure that OpenSSL is installed on your system:
[ramon]$ rpm -q openssl openssl-0.9.5a-14
Then you need to create a new directory for the CA using the following commands. Start by creating the directory that will hold Samba's CA:
[ramon]$ sudo mkdir /etc/samba/CA
Each certificate issued by this CA will carry a serial number. By adding the text "01" to 'ic jt the file /etc/samba/CA/serial, you are seeding the file that the CA will use for assigning serial numbers:
The index.txt file is used by the CA to maintain the database of certificates and must simply be created empty:
[ramon]$ sudo cp /dev/null index.txt
Next, you need to create an appropriate OpenSSL configuration file that will suit your needs. Start by copying the original /usr/share/ssl/openssl.cnf file to the /etc/samba /CA directory:
[ramon]$ sudo cp /usr/share/ssl/openssl.cnf openssl.cnf
Now edit the newly created openssl.cnf file to include these new settings:
dir = /etc/samba/CA # Where everything is kept new_certs_dir = $dir # default place for new certs.
certificate = $dir/ca-cert.pem # The CA certificate private_key = $dir/ca-key.pem # The private key
Note that you're simply changing the default base CA directory to be the one you created for Samba previously (/etc/samba/CA). You're also defining the CA's certificate and key to reside in /etc/samba/CA/ca-cert.pem and /etc/samba/CA/ca-key.pem, respectively.
Next, issue an openssl command to generate the CA's private key (ca-key.pem) and its X.509 certificate (ca-cert.pem):
[ramon]$ sudo openssl req -new -x509 -keyout ca-key.pem -out^ ca-cert.pem -days 365 -config openssl.cnf
Now you're ready to create a new certificate for the Samba server itself and sign it with the CA's secret key. Enter the following commands:
[ramon]$ sudo openssl req -nodes -new -x509 -keyout server-key.pem^ -out newreq.pem -days 365 -config openssl.cnf
[ramon]$ sudo openssl x509 -x509toreq -in newreq.pem -signkey^ server-key.pem -out tmp.pem
[ramon]$ sudo openssl ca -config openssl.cnf -policy policy_anything^ -out server-cert.pem -infiles tmp.pem
The first command creates a private key for the Samba server (server-key.pem) and a certificate-signing request (newreq.pem). The second and third commands take the certificate-signing request and use the CA's private key to sign the certificate. The resulting Samba certificate file is saved as the file server-cert.pem.
You also need to create a certificate for the client (the SSL proxy) because both the client and the server will need to authenticate each other. Create this certificate using the following commands:
[ramon]$ sudo openssl req -nodes -new -x509 -keyout proxy-key.pem^ -out newreq.pem -days 365 -config openssl.cnf
[ramon]$ sudo openssl x509 -x509toreq -in newreq.pem -signkey^ proxy-key.pem -out tmp.pem
[ramon]$ sudo openssl ca -config openssl.cnf -policy policy_anything^ -out proxy-cert.pem -infiles tmp.pem
You now have client and server certificates called proxy-cert.pem and server-cert.pem respectively, as well as corresponding private key files proxy-key.pem and server-key.pem. Note that you need to copy the proxy-cert.pem and proxy-key.pem files to the proxy machine. You'll learn more about the placement of these files in the section "Downloading and Installing SSL Proxy" later in this chapter.
Congratulations! You have now completed the OpenSSL configuration necessary to tunnel SMB requests over SSL. Next, you need to inform Samba of the existence of this configuration, by entering the appropriate directives in the /etc/samba/smb.conf file. This is the topic of the next section.
Configuring Samba for SSL support Table 8.1 lists the syntax of the directives necessary to make Samba SSL-aware, along with their meaning.
|
Directive |
Meaning | ||
|
ssl |
= [yes|no] |
Add SSL support. | |
|
ssl |
hosts = host1 |
host2 .. |
Hosts that must always use SSL to connect to this server |
|
ssl |
hosts resign = |
host1 host2 .. |
Hosts that do not use SSL to connect to this server |
|
ssl |
CA certDir |
Directory location of the certificates | |
|
ssl |
CA certFile |
File containing all certificates | |
|
ssl |
server cert |
Location of the server's certificate | |
|
ssl |
server key |
Location of the server's private key | |
|
ssl |
cyphers |
Cypher suite used during protocol negotiation | |
Using the directories in which the CA key and certificates were created in the previous section, the following smb.conf syntax configures SSL support into your Samba server:
ssl hosts resign = 209.1.78.1
ssl CA certFile = /etc/samba/CA/ca-cert.pem ssl server cert = /etc/samba/CA/server-cert.pem ssl server key = /etc/samba/CA/server-key.pem
In this example, you're forcing all SSL proxies on the 209.1.78.0/24 network to use SSL, except for 209.1.78.1. Note that while ssl CA certDir allows you to have a number of CA certificates in the specified directory, ssl CA certFile is used when all your CA certificates are in the same physical file. This suits you better because you only have one CA certificate (your own). The same applies to ssl server cert and ssl server key.
PART 3
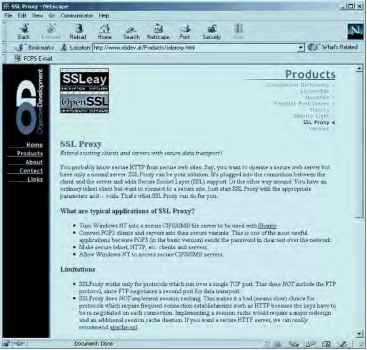
Downloading and Installing SSL Proxy Object Development's SSL Proxy package, the Web page for which is shown in Figure 8.6, can be installed on a Linux server on your network that will proxy SMB requests to all your remote Samba servers. You can download the SSL Proxy package from http://www.obdev.at/Products/sslproxy.html.
Figure 8.6 Object Development's SSL Proxy Web page
Figure 8.6 Object Development's SSL Proxy Web page
Simply scroll down to the bottom of the page and click the name of the source package. Once you have transferred the file to your home directory, enter the following commands:
[ramon]$ ls sslproxy.2000_Jan_29.tar sslproxy.2000_Jan_29.tar
[ramon]$ gunzip sslproxy.2000_Jan_29.tar.gz
[ramon]$ tar xvf sslproxy.2000_Jan_29.tar sslproxy.2000_Jan_29/ sslproxy.2000_Jan_29/Makefile sslproxy.2000_Jan_29/README.txt sslproxy.2000_Jan_29/dummyCert.pem sslproxy.2000_Jan_29/sslproxy.c sslproxy.2000_Jan_29/stdheaders.h
Since SSL Proxy comes in source format, you have to compile it using the included Makefile. Before you do that, however, make sure you have the openssl-devel RPM package, which is required by SSL Proxy. This package contains the OpenSSL header files and a library to compile applications against. Most distributions do not include openssl-devel in their standard installations, but you should be able to get the latest version from your favorite RPM archive. Once you have the RPM package, install it on your server using the following command:
[ramon]$ sudo rpm -i openssl-devel-0.9.5a-14.i386.rpm
Now you're ready to build your SSL Proxy executable. Enter the following commands: [ramon]$ cd sslproxy.2000_Jan_29 [ramon]$ make gcc -Wall -I/usr/local/openssl/include -O -c sslproxy.c -o sslproxy.o gcc -Wall -I/usr/local/openssl/include -O -o sslproxy sslproxy.o \
-L/usr/local/openssl/lib -lssl -lcrypto 1| j?
[ramon]$ sudo mv sslproxy /usr/sbin/ [ramon]$ sudo chown root:root /usr/sbin/sslproxy [ramon]$ ls -l /usr/sbin/sslproxy
-rwxr-xr-x 1 root root 28016 Dec 19 21:35 /usr/sbin/sslproxy
You have now created the executable /usr/sbin/sslproxy to accept SMB requests from your private network's Windows clients and to forward them over an SSL tunnel to a remote SMB server across the public network. The sslproxy executable takes the command-line options listed in Table 8.2.
|
Option |
Meaning |
|
-h |
Display help information. |
-L local-address Address where proxy should bind
-l port
Port where proxy should bind
|
Option |
Meaning |
|
-R address |
Remote IP address to connect to |
|
-r port |
Remote port number to connect to |
|
-s |
Run as server proxy |
|
-n |
Support NetBIOS |
|
-p protocol |
Protocol to use: ssl23, ssl1, ssl3, or tls1 (ssl23 is default) |
|
-c certificate |
Use the following certificate |
|
-k keyfile |
Use the following private key |
|
-v file |
Location of the CA certificate |
To start the SSL Proxy service, enter the following command:
[ramon]$ sudo sslproxy -l 139 -R tippecanoe -r 139 -s -n -c /etc^ proxy-cert.pem -k /etc/proxy-key.pem
This command listens for SMB requests on port 139 and forwards them to the host name tippecanoe (the remote SMB server) over an SSL tunnel. Note that the files /etc /proxy-cert.pem and /etc/proxy-key.pem are the ones that you created in the previous section. Simply copy them into the /etc directory of the proxy.
Thus far, this chapter has discussed the ins and outs of authenticating SMB clients, applying access control to SMB requests, and has even shown how you can protect the SMB traffic as it traverses a public network. To finish up the topic of Samba security, let's examine one of Samba's most recent features: its ability to act as a primary domain controller of a Windows NT domain.
Using Samba as a Windows NT Primary Domain Controller
The previous section on user authentication and access control discussed the feature that allows Samba to pass a set of client credentials to a domain controller for authentication. In the Windows NT authentication model, a user can log on to any NT workstation using "domain" authentication, where the local workstation relies on a set of domain controllers to hold the authentication, access control, and policy for the entire domain. The NT host designated to be the main authenticator is called the primary domain controller (PDC), while its subordinates are called backup domain controllers (BDCs).
Samba cannot only act as a client to an existing NT PDC; it can actually be configured to act as the PDC and handle authorization and access control requests from Windows NT hosts and other Samba servers in the network. While the current version as of the writing of this book (2.0.7) offers experimental PDC support, version 2.1 (which may be out by the time you read this book) is scheduled to incorporate this as a standard feature.
NOTE Samba 2.0.7 does not support Windows 2000 logins. Only Windows NT 3.51 SP5+ and 4.0 SP4+ machines can authenticate to Samba's PDC.
Samba PDC support includes adding new Windows NT client machines to the domain and providing domain authentication for users on those machines. These accounts can be viewed on the Windows NT host using the Server Manager and User Manager utilities, respectively. Samba allows for remote updates of both machine and user passwords. Absent from the list of supported features is the ability to establish a trust relationship between the Samba PDC and another domain controller, as well as the ability to act as a BDC. « &
The next section explains in detail how to configure a standard Samba installation to act as a PDC.
Setting Up the Samba PDC
First, make sure to modify the [global] stanza of your smb.conf file so that you are using password encryption. You also want to enable domain logons using the Samba PDC. These two capabilities are enabled in the following example:
[global]
encrypt passwords = yes workgroup = ACCOUNTING
domain logons = yes
Next, create machine accounts on the Samba server so that it knows how to interact with the Windows NT client hosts. Create an /etc/password entry using the NetBIOS name of the NT client, with a $ at the end. For example, the following entry is a machine account for an NT client named acct_server1:
acct_server1$:*:305:100:Accounting NT Server 1:/dev/nu11:/bin/fa1se
PART 3
Next, you need to add an entry to the separate Samba password file (typically named /etc/samba/smbpasswd), using the following command:
[ramon]$ sudo smbpasswd -a -m acct_server1
Added user acct_server1$.
On the NT host's acct_server1, run the User Manager for Domains and allow all users to log on locally. Also, run the Network Settings Control Panel utility and change your domain to ACCOUNTING (or whatever you set up in your smb.conf file). The NT host will welcome you to the new domain and ask you to reboot your PC.
When the NT machine comes back to life, press Ctrl+Alt+Del and watch the login dialog pop up. You should have two entries under Domain: the NetBIOS name of the NT host and the Samba Domain that you just created (ACCOUNTING). Enter a username and password combination that exists in the /etc/samba/smbpasswd file. If everything worked right the first time, you should be given access to the desktop after the authentication succeeds. If login is not successful, make sure that
■ The username/password combination exists in the Samba server's standard Linux /etc/passwd file (and /etc/shadow if you have shadow password support enabled).
■ You have successfully created an entry in /etc/samba/smbpasswd for the NT host that is requesting authentication on behalf of the user.
NOTE As you populate /etc/passwd with domain users with no need to log on to the Linux server, be sure to disable their accounts by inserting an asterisk (*) in their password field and use /bin/false as their shell.
Samba's PDC feature even allows you to assign domain administrator users, who can be given full privileges when they log on to the local NT system and authenticate using the Samba domain. Simply add the following line to the [global] stanza of smb.conf:
domain Admin Group = @admins
Then create a group called admins in the Linux /etc/group file that contains the list of users to whom you want to grant administrator privileges. In addition, Samba's PDC feature supports the use of NT logon scripts, which are small pieces of MS-DOS batch-style executable scripts that run every time a user logs on to the local NT host. By adding the following line to the [global] stanza of smb.conf logon script = scripts\%U.bat and a [netlogin] stanza as follows
[netlogin]
comment = Domain login service path = /home/samba/login public = no writeable = no browsable = no you're specifying that there is a file in the scripts directory (relative to the directory specified in the [netlogin] stanza), named after the username in question (%U variable substitution) with the .bat extension. For example, the following example shows that the /home/samba/login/scripts directory contains three logon scripts for usernames alice, bob, and charlie:
[ramon]$ ls -l /home/samba/login/scripts total 3
-rw-r--r-- 1 root root 152 Dec 20 23:14 alice.bat
-rw-r--r-- 1 root root 130 Dec 20 23:14 bob.bat
-rw-r--r-- 1 root root 122 Dec 20 23:14 charlie.bat
Even though you're making a general statement about the availability of these scripts for all users, no error is generated if a script does not exist for any particular user.
NT user profiles containing parameters like custom wallpaper, desktop arrangements, and shortcuts are stored in the user's Linux home directory every time they log off the domain, ready to be restored next time they log back in.
PART 3
WARNING It's important to make sure that logon scripts are owned by root and not writeable by anybody other than root. A world-writeable script can be exploited by an attacker to execute random commands on all your Windows users' desktops. This could have catastrophic consequences.
This concludes our discussion of the security features of the Samba file-sharing server. While the package offers a stunning array of configurations and available features, the centralized smb.conf file makes it easy to administer the security features. Samba affords companies that have invested in Linux training the opportunity to address their Windows file-sharing needs without introducing a new flavor of server operating system into their data center. As with any other complex server package, special care must be taken when configuring the service, and the system administrator should stay abreast of any newly discovered vulnerability that may put the security of the system in jeopardy.
Continue reading here: The Legacy ipfwadm and ipchains
Was this article helpful?