Network Based Auditing Tools
While there have always been attempts to build a comprehensive tool for exposing network vulnerabilities on a system, it wasn't accomplished until 1995, when Dan Farmer and Wietse Venema (who also created TCP Wrappers) released the first version of SATAN (Security Administrator's Tool for Analyzing Networks). This network-based auditing tool quickly became a household word among network and systems administrators. In their 1993 landmark paper, "Improving the Security of Your Site by Breaking Into It," Farmer and Venema capitalized on the concept of building an application that would systematically attempt to break into a target system, or even a range of systems within a subnet. Two years later, SATAN was born, and the initial response from the Linux community was overwhelmingly positive.
However, the release of SATAN did not come without some controversy. Although this was clearly a useful tool for uncovering your own host's vulnerabilities, it could also be used by intruders to find their way into just about any system on the Internet, as long as perimeter defenses permitted it. However, this did not diminish SATAN's usefulness, and soon thereafter there were two more SATAN follow-ups, SAINT (Security Administrator's Integrated Network Tool) and SARA (Security Auditor's Research Assistant).
SAINT provides improved vulnerability testing and detection, an improved user interface, and the capability to specify multiple levels of security. SAINT is much more robust than the original SATAN was, fixing a number of important bugs. SARA is a more modular package, with interfaces to third-party products such as Nmap and Samba. SARA also features an advanced report writer to document the vulnerabilities that it finds.
The latest evolution of this series of tools is Nessus, which, just like its predecessors, is a Web-driven application with a sophisticated back end that attempts to exploit and report on a number of known security vulnerabilities. The next section describes the Nessus application in more detail.
Nessus
The Nessus project was born in April 1998 as an initiative to replace the aging SATAN package with another free, Unix-based auditing toolkit. While a few commercial offerings were starting to become available at that time, these packages focused more on the style of their reports and on their network discovery abilities instead of on the robustness and completeness of their auditing features. In addition, the price of commercial auditing tools was (and still is) prohibitive for most companies.
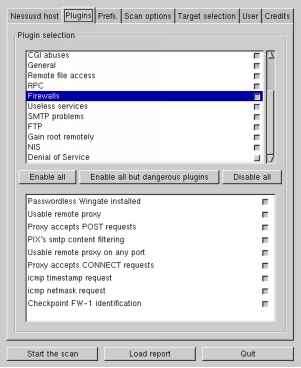
Nessus erupted as a free, open-source, full-featured, security-auditing tool that continues to see active support by developers around the world. New attack definitions are added daily, often just hours after being publicly announced. But if that's not up-to-the-minute enough, the modular architecture of Nessus allows you to write your own customized attack-check plug-in that can be seamlessly integrated into the system without the need for recompilation. For example, Listing 5.1 contains a plug-in that instructs Nessus to check whether the target system's Sendmail installation allows for anonymous mail relaying, a technique often used for spamming.
Listing 5.1 smtp_relay.nasl: Nessus plug-in script to check for Sendmail mail relaying fake = get_kb_item("Sendmai1/fake"); if(fake)exit(0);
# can't perform this test on localhost if(is1oca1host())exit(0);
port = get_kb_item("Services/smtp"); if(!port)port = 25;
data = recv(socket:soc, length:1024);
crp = string("HELO nessus.org\n");
send(socket:soc, data:crp);
data = recv_line(socket:soc, length:1024);
crp = string("MAIL FROM:[email protected]\n");
PART 2
send(socket:soc, data:crp);
data = recv_line(socket:soc, length:1024);
crp = string("RCPT TO: [email protected]\n");
send(socket:soc, data:crp);
security_warning(port);
set_kb_item(name:"Sendmail/spam", value:TRUE); }
close(soc);
There are two components to the Nessus system: the client (nessus) and the server (nessusd). You can control the server with a variety of different clients since these components are offered for Linux (X11/GTK), Windows32, and even as a Java application. The server maintains a list of users with an associated set of permissions, so it's possible for two clients to log on to the server to perform a separate set of auditing tasks at the same time. The privacy of the communication between the client and the server can be protected with one of a number of encryption protocols; payload compression can even be added.
The Nessus Attack Scripting Language (NASL) allows you to automate predefined security scans that can then be run periodically out of cron. The scripts simply select the server and plug-ins to be used, the security tests to be applied, and the range of addresses that you want to audit.
While the Nessus software remains in the public domain under the GPL agreement, nessus.com offers fee-based professional auditing services using the same code base. This ensures the continued development of the system and keeps its quality and usability high.
Installing Nessus The Nessus system can be installed from both the sources and from the RPM package distributions. I recommend that you install it using the RPM distributions, which are available from the same site as the sources. You need three separate RPM packages to build the entire Nessus distribution:
■ nessus-X.X.X-X.i386.rpm (the base system, including the server)
■ nessus-client-X.X.X-X.i386.rpm (the Linux client)
■ nessus-plugins-X.X.X-X.i386.rpm (the plug-ins)
The latest version of these files is always available from the RPM directory of ftp.nessus.org. Listing 5.2 shows how this is done.
Listing 5.2 Downloading Nessus RPM packages via ftp [ramon]$ ftp ftp.nessus.org
Connected to ftp.cis.fed.gov.
Name (ftp.nessus.org:ramon): anonymous
331 Guest login ok, send your complete e-mail address as password. Password:
230 Logged in anonymously.
Remote system type is UNIX.
Using binary mode to transfer files.
ftp> cd /pub/nessus/nessus-1.0.6/RPMS/i386
250 Vpub/nessus/nessus-1.0.6/RPMS/i386" is new cwd.
ftp> get nessus-1.0.6-1.i386.rpm local: nessus-1.0.6-1.i386.rpm remote: nessus-1.0.6-1.i386.rpm 200 PORT command successful.
150 Opening BINARY mode data connection for nessus-^ 1.0.6-1.i386.rpm (462536 bytes).
226 Transfer completed.
462536 bytes received in 31 secs (15 Kbytes/sec) ftp> get nessus-client-1.0.6-1.i386.rpm local: nessus-client-1.0.6-1.i386.rpm remote: nessus-client-^ 1.0.6-1.i386.rpm
200 PORT command successful.
150 Opening BINARY mode data connection for nessus-client-^ 1.0.6-1.i386.rpm (333438 bytes).
226 Transfer completed.
333438 bytes received in 22.6 secs (14 Kbytes/sec) ftp> get nessus-plugins-1.0.6-1.i386.rpm local: nessus-plugins-1.0.6-1.i 386.rpm remote: nessus-plugins-^ 1.0.6-1.i386.rpm
200 PORT command successful.
150 Opening BINARY mode data connection for nessus-plugins-^ 1.0.6-1.i386.rpm (390005 bytes).
226 Transfer completed.
390005 bytes received in 26.1 secs (15 Kbytes/sec) ftp> bye 221 Goodbye. [ramon]$
In addition to the Nessus software itself, make sure that your system has the following two packages (required by Nessus):
GTK GTK is The Gimp Toolkit, a set of Motif-like widgets that are used by the Nessus client's windowing system. Most Linux distributions install GTK by default.
PART 2
Run the following command to find out if your distribution includes GTK (you'll also need glib):
Nmap Nmap (The Network Mapper) is a port scanner that is discussed later in this chapter. The detailed installation instructions are described in the section "Nmap" later in this chapter.
Once you have verified that you have these two packages on your system, simply install the Nessus packages you downloaded using the rpm command (don't forget to use sudo to obtain root privileges):
|
[ramon]$ |
sudo |
rpm |
-i nessus |
-1.0.6-1.i386.rpm |
|
[ramon]$ |
sudo |
rpm |
-i nessus |
-plugins-1.0.6-1.i386.rpm |
|
[ramon]$ |
sudo |
rpm |
-i nessus |
-client-1.0.6-1.i386.rpm |
The Nessus software is now installed in your system. The next section will guide you through the process of configuring Nessus for use.
Configuring the Nessus Server Since a single Nessus server can be accessed from multiple clients, the server keeps its own database of users and performs its own authentication and authorization. So, the first step in configuring Nessus is to create a user account for the client. The utility /usr/sbin/nessus-adduser allows you to do just that, as shown in Listing 5.3.
Listing 5.3 Creating a user account on the Nessus server
[ramon]$ sudo /usr/sbin/nessus-adduser
Using /var/tmp as a temporary file holder
Add a new nessusd user
Login : ramon
Authentication method (cipher/plaintext) [cipher] : cipher Source restriction
Source host or network [anywhere] : 192.168.1.0/24 One time password : mySeCreT
User rules
Enter the rules for this user, and hit ctrl-D once you are done (the user can have an empty rules set)
accept 192.168.1.0/24
accept 10.0.0.0/24
default deny
Login : ramon
Auth. method : cipher, can connect from anywhere
One time password : mySeCreT
Rules :
accept 192.168.1.0/24
accept 10.0.0.0/24
default deny
Generating primes: q pg user added. [ramon]$
In the example in Listing 5.3, you have created a new usemame, ramon, who will use encryption (cipher) when attempting to connect to the Nessus server.
PART 2
NOTE Note that encryption is only available from the Unix version of the Nessus client at the moment. I recommend that you only use this client because strong authentication and protection of the client-server communication is a crucial component of the security of this tool.
User ramon is only allowed to connect to the Nessus server from a client with an IP address in the 192.168.1.0/24 block, and ramon is only allowed to scan target hosts that fall within 192.168.1.0/24 and 10.0.0.0/24 IP blocks. The general syntax of the User Rules section is
[accept|deny] ip/mask default [accept|deny]
The fields in this section have the following meanings:
■ mask is a decimal notation subnet mask (e.g., 24 for a full class C).
■ The [accept|deny] lines grant or deny access rights to a specific block of IP addresses.
■ The default line (usually at the end) defines the default action to take for IP blocks that don't fit any specific rule.
The nessusd server reads a configuration file upon startup. This file is typically located at /etc/nessus/nessusd.conf. Each line in this file can be a comment (starting with the # sign) or a definition of the following format:
variable-name = value
I recommend that you use the configuration file defaults to start out with, unless you decide to move some of the Nessus files from the place where RPM drops them. Listing 5.4 shows the variables in the nessusd.conf file that contain the paths of the Nessus files.
Listing 5.4 nessus.confdirectory path definitions
# Path to the security checks folder : p1ugins_fo1der = /usr/lib/nessus/plugins
logfile = /var/log/nessus/nessusd.messages
# Dump file for debugging output, use for stdout : dumpfile = /var/log/nessus/nessusd.dmp
rules = /etc/nessus/nessusd.rules
# Users Database :
users = /etc/nessus/nessusd.users
The variables in Listing 5.4 are used as follows:
■ The p1ugins_fo1der variable specifies the folder that contains the plug-ins Nessus uses to check for vulnerabilities on the target system.
■ The logfile variable specifies the file where the Nessus application will direct all log events. If the value of logfile is syslog, all events will be logged using the Linux syslog facility.
■ The dumpfile variable specifies the target file of the debugging output.
■ The rules variable points to the location of the Nessus daemon's rulesets.
■ The users variable stores a reference to a file containing the users that are allowed to log on to the Nessus application.
Once you have edited the nessusd.conf file, it's time to start the nessusd daemon. The next section describes the details of this operation.
Running the Nessus Daemon By default, the RPM installation of Nessus creates a daemon called /usr/sbin/nessusd. The nessusd daemon listens for client requests to scan one or more target hosts.
NOTE The nessususd daemon must be started by the root user.
The command-line usage for the nessususd daemon is as follows:
nessusd [--background] [--config-file=config_file] [--listen=IP_ address] [--port=port]
Table 5.1 describes the nessusd command-line options, their meanings, and their default values.
|
Option |
Meaning |
Default | |||||||||||||||||||||||||||||||||||||||||||||||||||||||||||||||||||||||||||||||||||||||||||||||||||||||||||||||||||||||||
|
--background |
Run as a daemon (start and send to background). |
N/A | |||||||||||||||||||||||||||||||||||||||||||||||||||||||||||||||||||||||||||||||||||||||||||||||||||||||||||||||||||||||||
|
--config-file=config_fi7e |
Use an alternate configuration file. |
/etc/nessus/ nessusd.conf | |||||||||||||||||||||||||||||||||||||||||||||||||||||||||||||||||||||||||||||||||||||||||||||||||||||||||||||||||||||||||
|
--listen=IP_address |
Address from which to accept requests. This overrides any rules that a given user may have associated with them. |
Listen on an alternate port. 3001 --port=port Listen on an alternate port. 3001 PART 2In general, you start the nessusd daemon by simply issuing the following command; the -D option in this command instructs the daemon to run in the background, giving you back control of the terminal session: [ramon]$ sudo /usr/sbin/nessusd -D At this point, you're ready to fire up the Nessus client and start scanning some of your Linux servers to look for security vulnerabilities. The next section guides you through that process. Configuring and Running the Nessus Client Since you're a Linux administrator, you'll probably feel comfortable running the Linux client, which is the most robust of the clients by far. To invoke it for the first time, simply type the following command: [ramon]$ /usr/bin/nessus At this point, a dialog box appears asking you to create a new passphrase (see Figure 5.1). This is the secret that protects your private key. Once your private key is unlocked, the client and the server use public-key authentication to come up with a symmetric key to protect all subsequent communication. If this is not the first time you invoke Nessus from your account, the client simply asks you to provide the passphrase that you specified the first time (Figure 5.2). Figure 5.1 Creating a new Nessus client passphrase Figure 5.1 Creating a new Nessus client passphrase 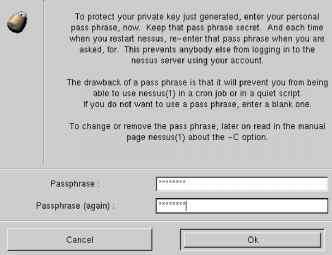
Figure 5.2 Entering the Nessus client passphrase
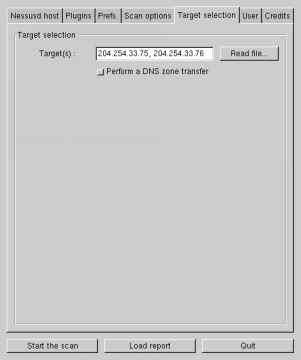
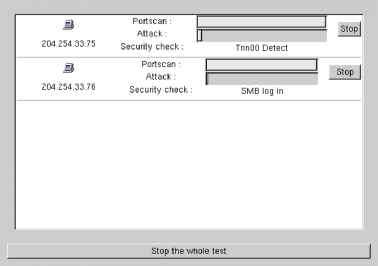
If the passphrase is correct, the client displays the main menu, which is open to the Nessusd Host tab by default. This is where you point the client to the appropriate server. In the example in Figure 5.3, the server is nessus.example.com and the username being used to log on is ramon. Figure 5.3 Logging on to the Nessus server Nessusd host | Plugins | Prefs. | Scan options | Target selection | User | Credits New session setup ^ Nessusd Host : |nessus.example.com Port : J 3001 Encryption : |twofish/rlpemd160:3 Q Login : |ramon
| |||||||||||||||||||||||||||||||||||||||||||||||||||||||||||||||||||||||||||||||||||||||||||||||||||||||||||||||||||||||||