Configuring Windows SOCKS5 Clients
While it's fairly trivial to modify the Linux environment for SOCKS5 clients, there is typically also a strong need for Windows-based clients to use the proxy server to connect to the public Internet. You clearly cannot modify each Windows application to use the SOCKS5 libraries, so you need a shim, a network driver that will insert itself in the WinSock TCP/IP stack and intercept all connection requests. The SOCKS5 developers augmented the capability of the Linux server with SOCKSCap, a Windows-based application that effectively SOCKS-ifies any WinSock-compliant Windows application.
Available from NEC USA's Web site in ready-to-install format, SOCKSCap can be executed in the background whenever a Windows user needs to access a host outside the SOCKS5 server. To install and configure SOCKSCap, just follow these simple steps:
1. Download the self-extracting SOCKSCap binary from www.socks.nec.com.
2. Double-click the binary and follow the directions of the Install wizard.
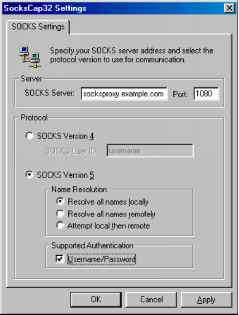
3. Once the installation is complete with no errors, start the application. On its first execution, it prompts you to enter the initial configuration (see Figure 10.5). While SOCKSCap supports both the SOCKS4 and SOCKS5 protocol, I strongly suggest that you use SOCKS5 for all your clients when possible. Don't forget to click the Username/Password checkbox at the bottom of the Settings window.
Figure 10.5 Setting the SOCKSCap initial configuration options
Figure 10.5 Setting the SOCKSCap initial configuration options
4. From this point forward, simply invoke the SOCKSCap application from the Start menu. When configured for SOCKS5, SOCKSCap prompts you for your SOCKS5 username/password (as shown in Figure 10.6). This is the authentication information that SOCKSCap uses on behalf of all your SOCKS-ified applications.
Figure 10.6 The SOCKSCap user authentication dialog
|
SocksCap32 Usemame/Password Authentication EJl | |
|
SOCKS Version 5 Username: SOCKS Version 5 Password: |
Istacia 1—1 |
|
OK | |
Cancel | |
|
1 | |
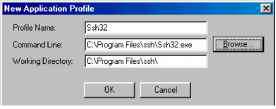
5. Once you have entered your authentication information, the standard SOCKSCap panel appears, on which you can add new applications that you want to launch using SOCKS5. For example, you may want to SOCKS-ify your Secure Shell (SSH) client. Simply click the New button and specify the path and working directory of the SSH application (see Figure 10.7). This adds ssh32 to the list of SOCKS-ified applications that SOCKSCap controls.
Figure 10.7 Adding a new application to be launched by SOCKSCap
Figure 10.7 Adding a new application to be launched by SOCKSCap
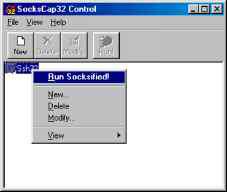
6. At this point you're ready to launch the new application under SOCKSCap. Simply click the application's icon inside SOCKSCap, right-click and select Run Socksified, as shown in Figure 10. 8. From this point on, your user will authenticate to the Linux proxy as Stacia and the password will be the one entered in the authentication box. To stop execution of the SOCKS-ified application, simply exit from it as you normally would. SOCKSCap can control any number of network applications, as long as they're Winsock-compliant.
PART 4
Figure 10.8 Launching an application from SOCKSCap
Figure 10.8 Launching an application from SOCKSCap
Continue reading here: FWTK The TIS Firewall Toolkit
Was this article helpful?