Sample Firewall Scenarios
The following example scenarios should capture the most popular network architectures in place today, from the simple dial-on-demand connection to a complex scenario featuring a dedicated router and a demilitarized zone where you can offer public services without compromising the security of your private network.
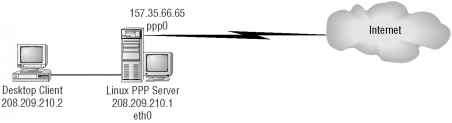
Single-Homed Dial-up Server
Most small enterprises or branch offices have a single, non-dedicated connection to the Internet, and they don't want anyone coming back into their network or their firewall. Furthermore, many of these temporary connections are broadband (Internet over cable) connections, where the medium is shared by all the subscribers who are currently connected. This is breeding ground for intrusion and eavesdropping, and firewall protection should always be included in such a scenario.
In addition, most home users that use DSL or cable connections typically have more than one host on their network from which they want to access the public Internet. Linux offers NPAT network address translation through Netfilter's masquerading feature.
Consider the example (illustrated in Figure 9.3) where your dial-up server has two interfaces:
■ ppp0, a dial-on-demand point-to-point protocol connection to your ISP
■ eth0, a fast Ethernet connection to your private LAN
Figure 9.3 Single-homed dial-up server architecture
Figure 9.3 Single-homed dial-up server architecture
Let's create an iptables configuration for this scenario. Take a look at Listing 9.1.
Listing 9.1 Single-homed dial-up server iptables -N protect iptables -A protect -m state --state ESTABLISHED,RELATED -j ACCEPT iptables -A protect -m state --state NEW -i ! ppp0 -j ACCEPT
iptables -A protect -j DROP iptables -A INPUT -j protect iptables -A FORWARD -j protect
The first line defines a new chain called protect, which is where you'll do all your filtering. (This is done for convenience, so that you don't have to enter the same filter rules in multiple built-in chains.) The second line instructs iptables to allow any incoming packets to the dial-up server as long as they are in response to a previously open connection (ESTABLISHED, RELATED). The third line allows new connections to be forwarded through the firewall, but only if the connection is not coming from interface ppp0; thus, it must be coming from eth0, the only other interface on the server. This ensures that it is an outgoing connection. The fourth line finishes the protect chain with a stealth rule, ensuring that any traffic that does not match a previous rule is dropped by the firewall.
The last two lines in Listing 9.1 are not part of the newly created protect chain, as the -A options of those lines clearly indicate. These two lines are the rules that send packets to the new chain by forwarding packets that arrive in the input, forward chains to the protect chain. Note that you are not restricting the output chain at all, so you are allowing any outbound connections that originate from the dial-up server itself.
Dual-Homed Firewall: Public and Private Addresses
At a company's central location and at some of its larger branch offices, you'll typically find a dedicated router supporting a full-time connection to the Internet. The most straightforward perimeter security architecture calls for a firewall device in series with the .{=
LAN connection to the router. Such a device ensures that all traffic coming in and out of g t/i the Internet is inspected by the packet-filtering firewall. Consider the sample architecture 5 depicted in Figure 9.4, where the local network is 208.209.210.0/24 and the router's pub- J lic interface is 157.35.66.65. £
PART 4
Figure 9.4 Dual-homed firewall architecture
Linux Firewall
Figure 9.4 Dual-homed firewall architecture
Linux Firewall

- 208.209.210.2 208.209.210.3
NOTE The firewall's public interface and the router's private interface do not need routable addresses because their connection is in essence point-to-point. You use the 10.0.0.0/24 network for this connection.
Let's consider a policy (in Listing 9.2) that allows for SSH inbound access, while blocking all other type of requests. All types of outbound TCP connections are still permitted. ICMP inbound traffic is restricted to echo requests (service 0).
Listing 9.2 Dual-homed firewall architecture: SSH incoming services
# Flush all the rules out of the the chains iptables -F INPUT
iptables -F OUTPUT iptables -F FORWARD
# Set the default policy for the FORWARD chain to deny all iptables -P FORWARD deny
# Block all incoming traffic coming from public interface (eth0) iptables -A INPUT -i eth0 -j DROP
# Block all outgoing traffic going out the public interface (eth0) iptables -A OUTPUT -o eth0 -j DROP
# Instruct Netfilter to accept fragmented packets (-f) iptables -A FORWARD -f -j ACCEPT
# Accept incoming TCP packets from established connections
# (--state ESTABLISHED,RELATED)
iptables -A FORWARD -m state -p tcp --state ESTABLISHED,RELATED -j ACCEPT
# Accept incoming TCP connections to SSH arriving at eth0
iptables -A FORWARD -p tcp -i eth0 -d 208.209.210.0/24 --dport ssh -j ACCEPT
# Accept all outgoing TCP connections entering the private
# interface (eth1)
iptables -A FORWARD -p tcp -i ethl -j ACCEPT
# Accept all outgoing UDP connections entering the private
# interface (eth1)
iptables -A FORWARD -p udp -i ethl -j ACCEPT
# Accept incoming ICMP packet of "echo reply (=0)" type (ping replies) iptables -A FORWARD -p icmp -i eth0 -d 208.209.210.0/24
# Accept all outgoing ICMP connections entering the private
# interface (eth1)
iptables -A FORWARD -p icmp -i ethl -j ACCEPT
# Drop all other traffic in the FORWARD chain iptables -A FORWARD -j DROP
Note that the last line is not really needed because you have established a deny policy (where everything is denied by default unless specifically allowed) for the forward chain at the top of the script. However, it's always a good idea to err on the side of caution.
Next, let's restrict the previous policy by only allowing SSH, WWW, SMTP, and DNS outbound services (see Listing 9.3).The lines in boldface are the changes from the previous scenario in Listing 9.2.
Listing 9.3 Dual-homed firewall architecture: SSH incoming services, SSH, WWW, SMTP, and DNS outgoing services only
# Flush all the rules out of the chains iptables -F INPUT
iptables -F OUTPUT =
# Set the default policy for the FORWARD chain to deny all '= iptables -P FORWARD deny
PART 4
# Block all incoming traffic coming from public interface (eth0) iptables -A INPUT -i eth0 -j DROP
# Block all outgoing traffic going out the public interface (etho) iptables -A OUTPUT -o eth0 -j DROP
# Instruct Netfilter to accept fragmented packets (-f) iptables -A FORWARD -f -j ACCEPT
# Accept incoming TCP packets from established connections
# (--state ESTABLISHED,RELATED)iptab1es -A FORWARD -m state -p tcp --stated ESTABLISHED,RELATED -j ACCEPT
# Accept incoming TCP connections to SSH arriving at eth0
iptables -A FORWARD -p tcp -i eth0 -d 208.209.210.0/24 --dport ssh -j ACCEPT
# Accept outgoing TCP connections to SSH, WWW, SMTP only iptables -A FORWARD -p tcp -i eth1 --dport ssh,www,smtp -j ACCEPT
# Accept incoming UDP packets as response from DNS service (port 53) iptables -A FORWARD -p udp -i eth0 --sport domain -j ACCEPT
# Accept outgoing UDP connections to port 53 (DNS) only iptables -A FORWARD -p udp -i eth1 --dport domain -j ACCEPT
# Accept incoming ICMP packet of "echo reply (=0)" type (ping replies) iptables -A FORWARD -p icmp -i eth0 -d 208.209.210.0/24
# Accept all outgoing ICMP connections entering the private
# interface (eth1)
iptables -A FORWARD -p icmp -i eth1 -j ACCEPT
# Drop all other traffic in the FORWARD chain iptables -A FORWARD -j DROP
Note that, unlike TCP services like SSH and telnet, you cannot effectively restrict return UDP traffic to packets that reflect an established outgoing connection. This means that you need to allow your firewall to accept all UDP traffic whose source port is 53 (DNS— domain lookup service).
Triple-Homed Firewall with a Demilitarized Zone
A more elaborate network architecture features a triple-homed firewall, including a public interface, a private interface, and a third interface that services a demilitarized zone (DMZ). The DMZ allows you to offer public services with some degree of control, and without allowing anonymous users entry in your private network space. Figure 9.5 illustrates the triple-homed firewall, which adds a new network 64.65.66.0/24 that serves the DMZ with two servers (Web and Mail) to the architecture depicted in Figure 9.4.
Figure 9.5 Triple-homed firewall architecture with DMZ
Linux Firewall 208.209.210.1 eth1
Linux Firewall 208.209.210.1 eth1
Desktop Client 208.209.210.2
Desktop Client 208.209.210.2
10.0.0.1 Ethernet0
157.35.66.65 Serial0
|
64.65.66.1 | |
|
eth2 |
Desktop Client 208.209.210.3
Desktop Client 208.209.210.3
Router
Web Server 64.65.66.2
Internet
Mail Server 64.55.66.3
To extend the dual-homed firewall example (SSH and telnet inbound, all outbound), you add a policy (see Listing 9.4) that allows only your remote branch users (from network 128.129.130/24) access to the DMZ Web server, while granting unrestricted Internet access to the DMZ Mail server. The lines in boldface are the changes from the previous scenario (Listing 9.3).
Listing 9.4 Sample iptables script for triple-homed firewall architecture with DMZ
# Flush all the rules out of all three default chains iptables -F INPUT
iptables -F OUTPUT iptables -F FORWARD
# Set the default policy for the FORWARD chain to deny all iptables -P FORWARD deny
# Block all incoming traffic coming from public interface (eth0) iptables -A INPUT -i eth0 -j DROP
# Block all outgoing traffic going out the public interface (eth0) iptables -A OUTPUT -o eth0 -j DROP
# Instruct Netfilter to accept fragmented packets (-f)
PART 4
iptables -A FORWARD -f -j ACCEPT
# Accept incoming TCP packets from established connections
# (--state ESTABLISHED,RELATED)
iptables -A FORWARD -m state -p tcp --state ESTABLISHED,RELATED -j ACCEPT
# Accept incoming TCP connections to SSH arriving at eth0 iptables -A FORWARD -p tcp -i eth0 -d 208.209.210.0/24
# Accept incoming TCP connections to SSH arriving at eth0 iptables -A FORWARD -p tcp -i eth0 -d 208.209.210.0/24 --dport ssh -j ACCEPT
# Accept incoming TCP connections to DMZ SMTP server (64.65.66.3) iptables -A FORWARD -p tcp -i eth0 -d 64.65.66.3
# Accept incoming TCP connections to Web server from remote branch only iptables -A FORWARD -p tcp -i eth0 -s 128.129.130.0/24 -d 64.65.66.2 --dport^ www -j ACCEPT
# Accept all outgoing TCP connections received via both ethl and eth2
# (the private and the DMZ interfaces respectively) iptables -A FORWARD -p tcp -i eth1,eth2 -j ACCEPT
# Accept all outgoing UDP connections received via both ethl and eth2
# (the private and the DMZ interfaces respectively) iptables -A FORWARD -p udp -i eth1,eth2 -j ACCEPT
# Accept incoming ICMP packet of "echo reply (=0)" type (ping replies) iptables -A FORWARD -p icmp -i eth0 -d 208.209.210.0/24
--icmp-type 0 -j ACCEPT iptables -A FORWARD -p icmp -i eth0 -d 64.65.66.0/24 --icmp-type 0 -j ACCEPT
# Accept all outoing ICMP connections received from either the
# private interface (eth1) or the DMZ interface (eth2) iptables -A FORWARD -p icmp -i ethl, eth2 -j ACCEPT
# Drop all other traffic in the FORWARD chain iptables -A FORWARD -j DROP
In Listing 9.4, you have simply added two rules to the forward chain, one to allow all SMTP traffic to the mail server (64.65.66.3) and another to allow traffic source from 128.129.130.0/24 to connect to port 80 of the DMZ Web server (64.65.66.3). Note that you must also allow ICMP responses to enter eth0 bound for the DMZ, and to exit through the DMZ interface, eth2.
Protecting Against Well-Known Attacks
Aside from the capability to enforce access control to your internal hosts, Netfilter and iptables can be used to protect against specific types of Internet attacks by filtering traffic that matches the fingerprint of the attack. This section describes sample iptables statements that you can use to address a number of these well-known vulnerabilities.
Address Spoofing
Many firewall configurations allow the packet to be forwarded after verifying that it has an address from the private network in the source field of the header. The problem is that it's trivial for an attacker to synthetically create a "spoofed" packet generated from their network but with your source address. Protect your site from address spoofing by requiring that packets with the local network's source address be received on the interface connected to the local network using an iptables command like the following:
iptables -A FORWARD -s internal_network -i public_interface -j DROP
This command is adding a rule to the forward chain that matches traffic sourced from the internal network, but that enters the system at the public interface. By adding this command, you are forcing Netfilter to drop spoofed packets arriving at the public interface -j:
of your firewall. S
For example, consider the dual-homed firewall architecture depicted back in Figure 9.4, | where the local network is 208.209.210.0/24 and the router's public interface is 5
157.35.66.65. An address-spoofing rule for this firewall would look like the following:
PART 4
iptables -A FORWARD -s 208.209.210.0/24 -i eth0 -j DROP
This rule examines packets that arrive in the public interface (eth0) and drops them quietly if they carry a source address in the (private) 208.209.210.0/24 network.
Smurf Attack
A smurf attack is staged by sending an ICMP echo request (ping) packet to the broadcast address of your internal network. The packet's source is forged with the address of the target of the smurf attack, which gets flooded by ICMP echo responses from all your internal hosts.
The following iptables command should guard against smurf attacks by preventing the forged ICMP echo-request from entering your network:
iptables -A FORWARD -p icmp -d internal_network_broadcast_address -j^ DENY
This command adds a rule to the forward chain that matches any ICMP packets coming into any of the interfaces of the firewall whose destination is the broadcast address of your internal LAN. When this rule is matched, the packet takes the DROP action. For example, in the network depicted back in Figure 9.4, you would use the following command:
iptables -A FORWARD -p icmp -d 208.209.210.255 -j DENY
In this case, you're looking for ICMP traffic whose destination is 208.209.210.255, the broadcast address of the 208.209.210.0/24 network.
Syn-Flood Attack
A syn-flood attack is staged by sending a large number of TCP connection requests (with the SYN flag set) to a host while suppressing the normal SYN-ACK responses, thereby attempting to consume all its available data structures, which are busy keeping track of these half-open connections.
Using the limit external matching module, you can throttle the acceptance of TCP SYN requests to one per second using the following iptables command:
iptables -A FORWARD -p tcp --syn -m limit --limit 1/s -j ACCEPT
A rate of one TCP SYN request per second should be acceptable for most Internet servers, but it restricts just enough occurrences of incoming SYN requests to ensure that your systems always have enough available resources to handle legitimate connections.
Port-Scanner Attack
Many port-scanner applications try to identify every open TCP and UDP port in your system by sending a SYN or FIN signal to a given port range and expecting a RST signal for those ports not active. You can limit this activity to one incidence per second with the following iptables command:
iptables -A FORWARD -p tcp --tcp-flags SYN,ACK,FIN,RST RST -m limit -limit 1/s -j ACCEPT
This command adds a rule to the forward chain that matches TCP traffic that arrives at the firewall with the SYN, ACK, and FIN flags unset, and the RST flag set. When a packet matches this description, it is only accepted at a rate of one per second.
Ping-of-Death Attack
It is possible to kill certain operating systems by sending unusually large and unusually frequent ICMP echo (ping) requests. This is called a ping-of-death attack. The following iptables command limits the acceptance of such pings to one per second:
iptables -A FORWARD -p icmp --icmp-type echo-request -m limits --limit 1/s -j ACCEPT
In fact, I recommend that you block ICMP requests at your firewall altogether using the command iptables -A FORWARD -p icmp --icmp-type echo-request -j DROP
unless you have a legitimate need to have your host be reached via ping from the outside.
Continue reading here: The Nec Socks5 Proxy Server
Was this article helpful?

